
Create a Free Digital Business Card with Divi
Digital business cards are the on-line replacement for the traditional paper business card. It’s an easy way to share and save contact information quickly whether you are networking in-person or virtually over a Zoom call. We will show how you can implement this for free using the Divi theme and WordPress.
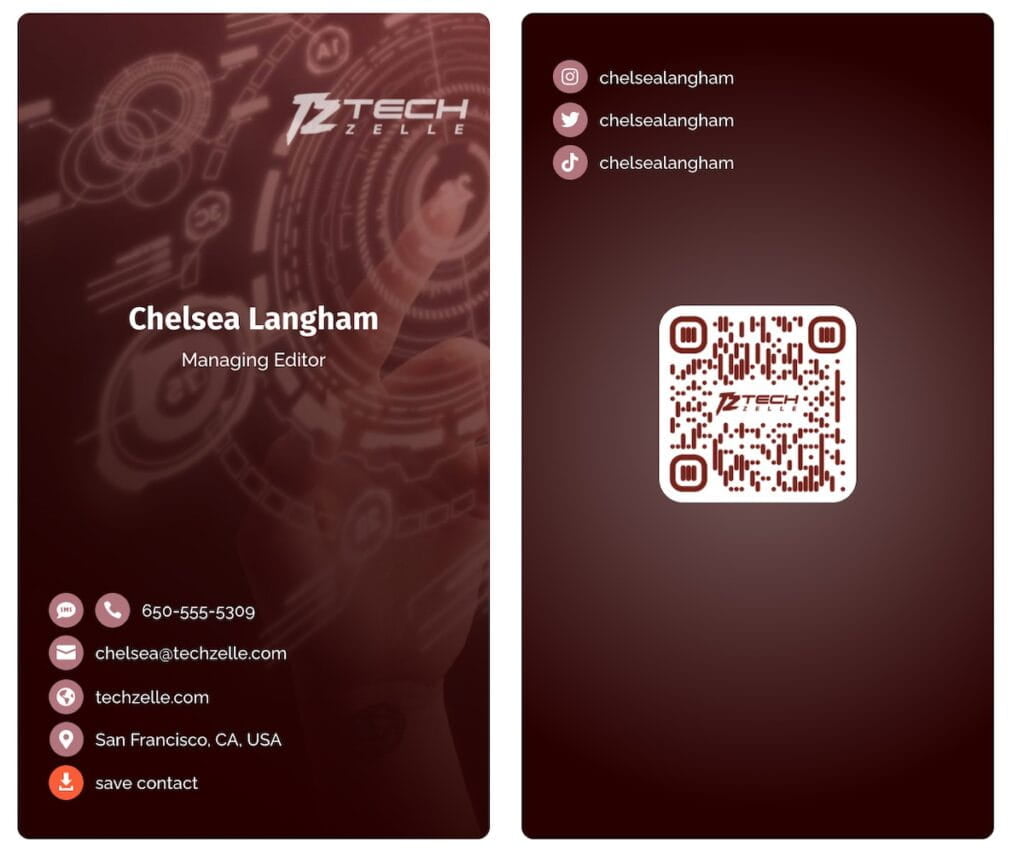
The best feature of digital business cards is that the person can click a “save contact” link to automatically create an entry in their contact app for you. You control what information is filled in, including a profile photo.
Aside from being an environmentally-friendly, contactless way to share, digital business cards can be updated instantly and provide links to texts, calls, emails, maps, and social media.
Finally, since you already have a Divi WordPress website, you won’t need to pay anyone anything. You don’t need a special app or monthly fees. You can create, host, and maintain your own digital business card for free.
Using a Divi Digital Business Card
The typical way of sharing is through a QR Code. If you have a storefront or office, you can print out the QR code for people to scan. For in-person sharing, I like putting the QR code on your cell phone lock screen (or home screen) for fastest access. You can also just keep it as a favorite photo on your phone or watch.
The other method of sharing is through sending the URL link to your business card. That can be sent via text or email, or be put in your email signature.
There is also an NFC / RFID type of business card. I don’t recommended that one as you need to carry around an RFID tag, and it only works in-person. The QR Code is the way to go.
Creating Your Divi Digital Business Card
There are three parts to creating your own digital business card.
- Create a QR code
- Create a VCF / vCard file
- Create a Divi page as your digital business card
It’s as simple as that. Ready to go? Let’s get started.
Create A Digital Business Card QR Code
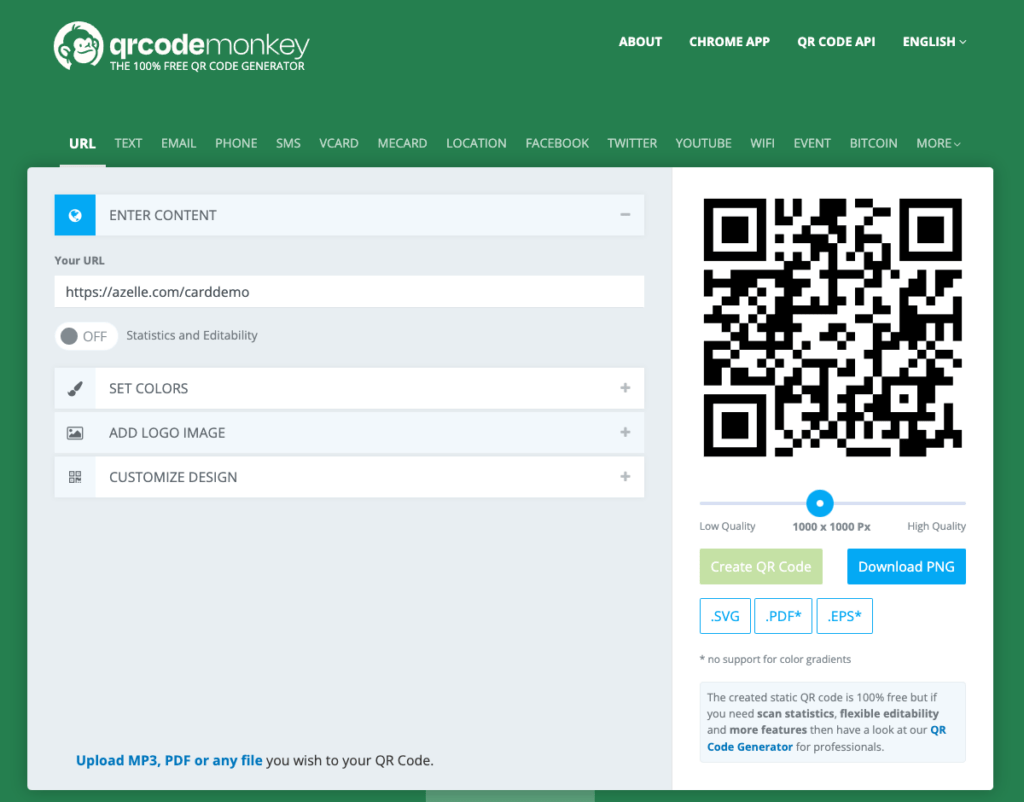
There are a number of free QR code generators available online. The one I like is qrcodemonkey
It’s free and has a number of customizations like colors, adding your logo, and tweaking the design components.
Set Content To The URL Of Your Digital Business Card
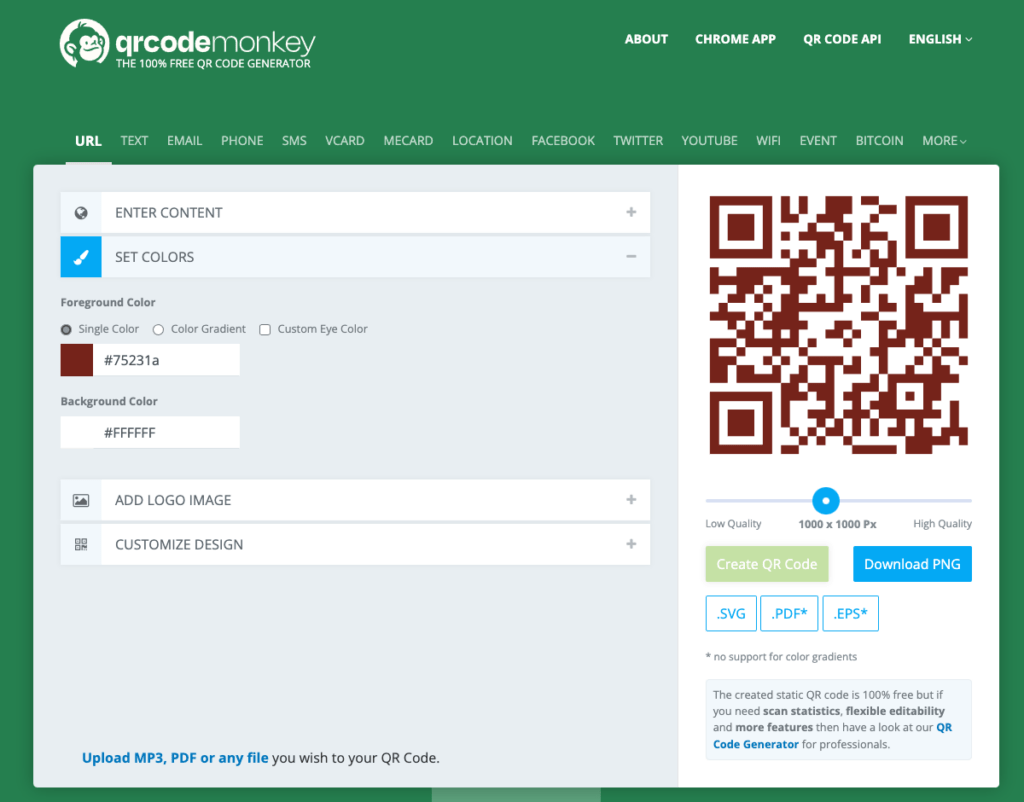
Choose QR Code Colors
Add Your Logo To QR Code
Put a checkmark in the “Remove Background Behind Logo” box
Customize QR Code Design Elements
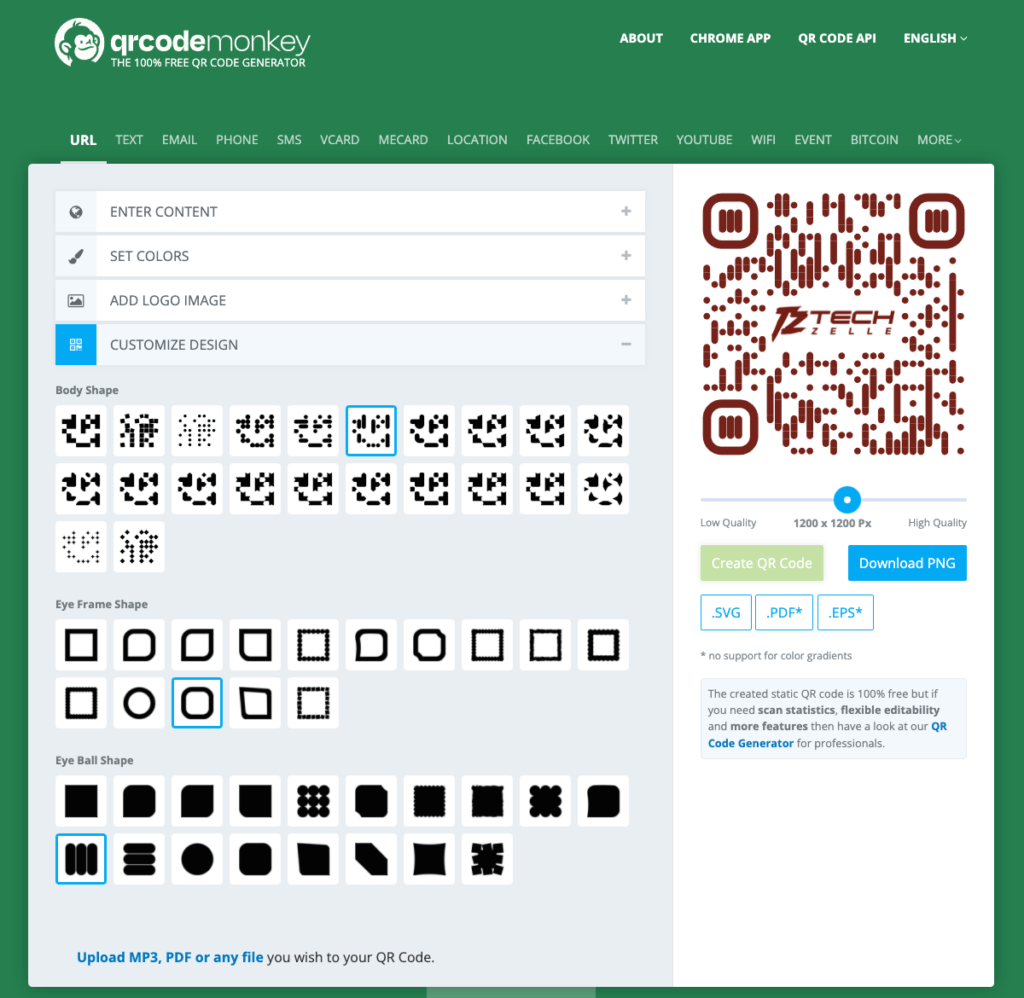
- Set Quality slider to 1000 x 1000 Px
- Click “Create QR Code”
- Click “Download PNG” (Note: you can also use the .SVG button if your site supports that format)
Create A Digital Business Card VCF File
There are lots of ways to create a vCard (.vcf file) or Virtual Business Card file. This file contains your name, company, addresses, emails, phones, and even a profile photo. The vCard can then be imported into your prospect’s contact list, whether they are using Apple Contacts, Google Contacts, Microsoft Outlook, etc.
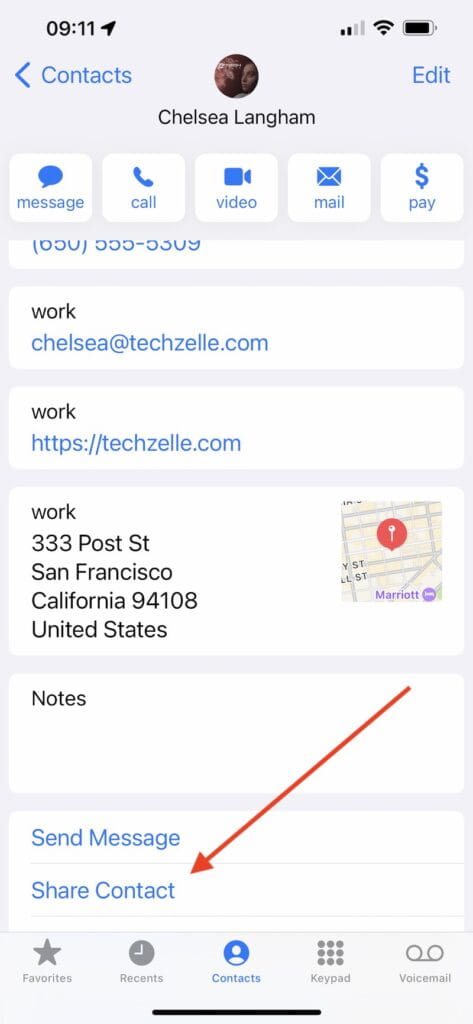
The easiest way is to create your vCard file is to set it up in your own contact software then export it from there.
For example in Apple Contacts, create a contact then use the Share Contact link to save it as a file through AirDrop or email attachment.
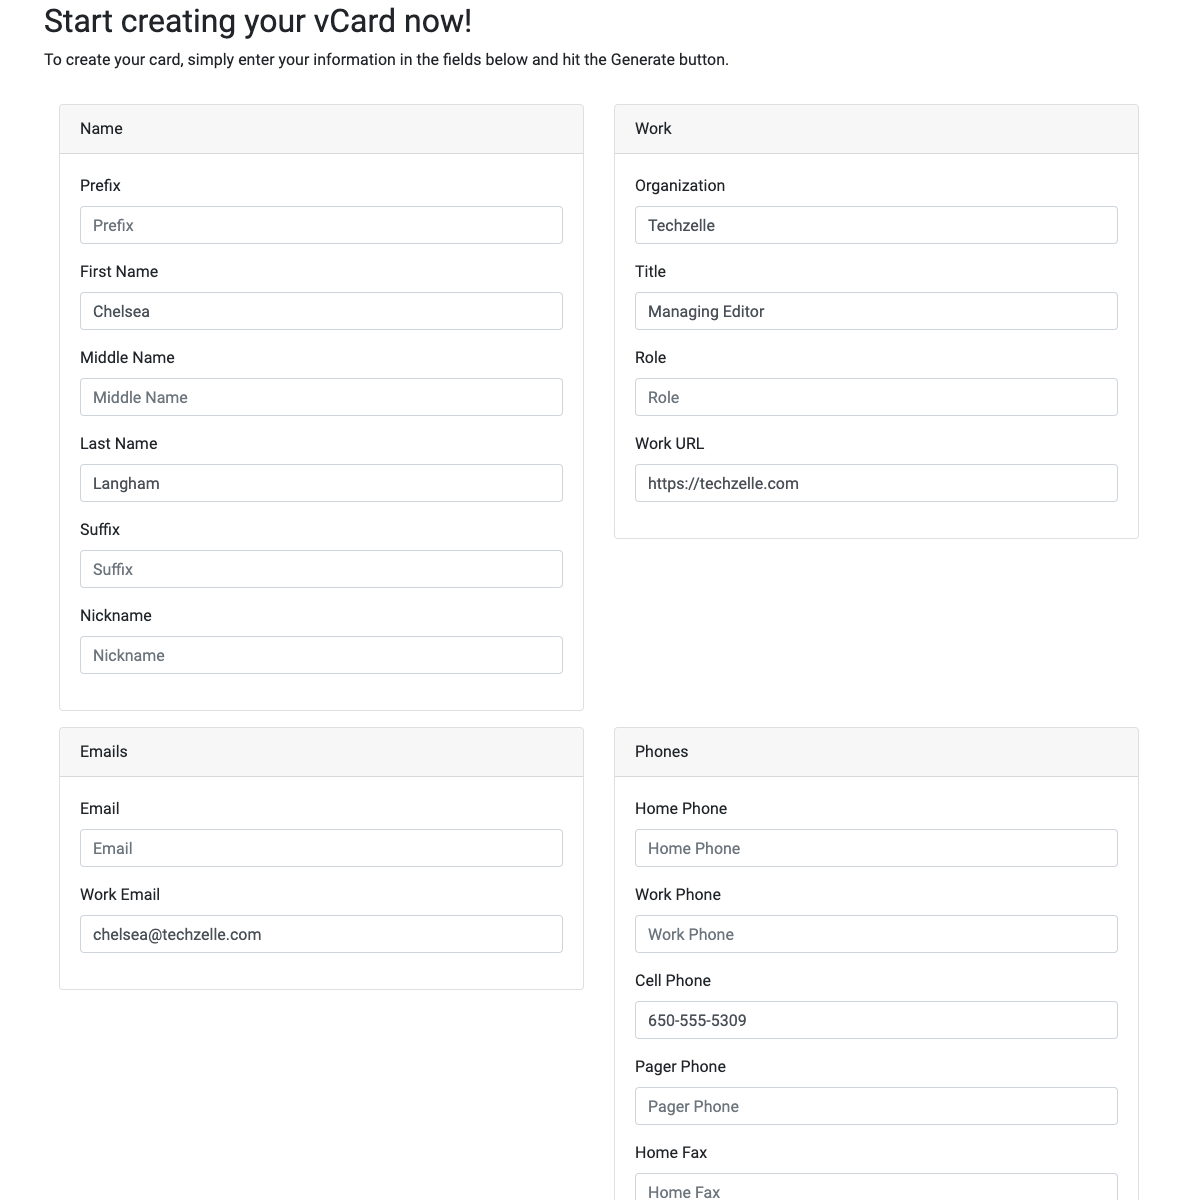
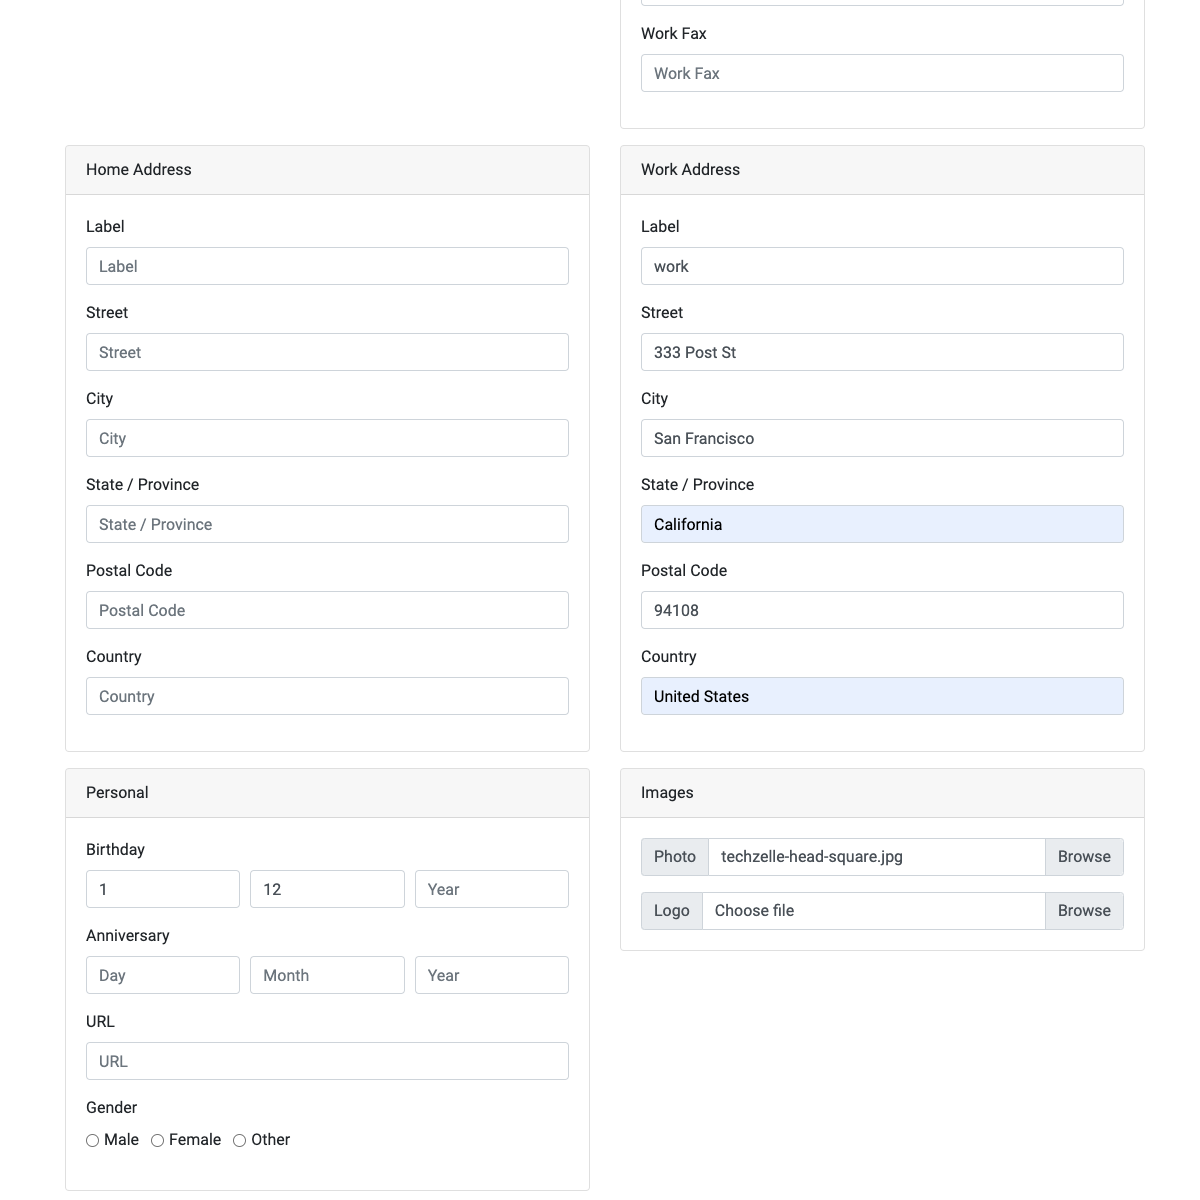
Another way to create a vCard is through a website, my favorite is vcardmaker
Go to the website, fill in the desired text fields, upload a square photo for your profile photo, then click the GENERATE button at the bottom of the form
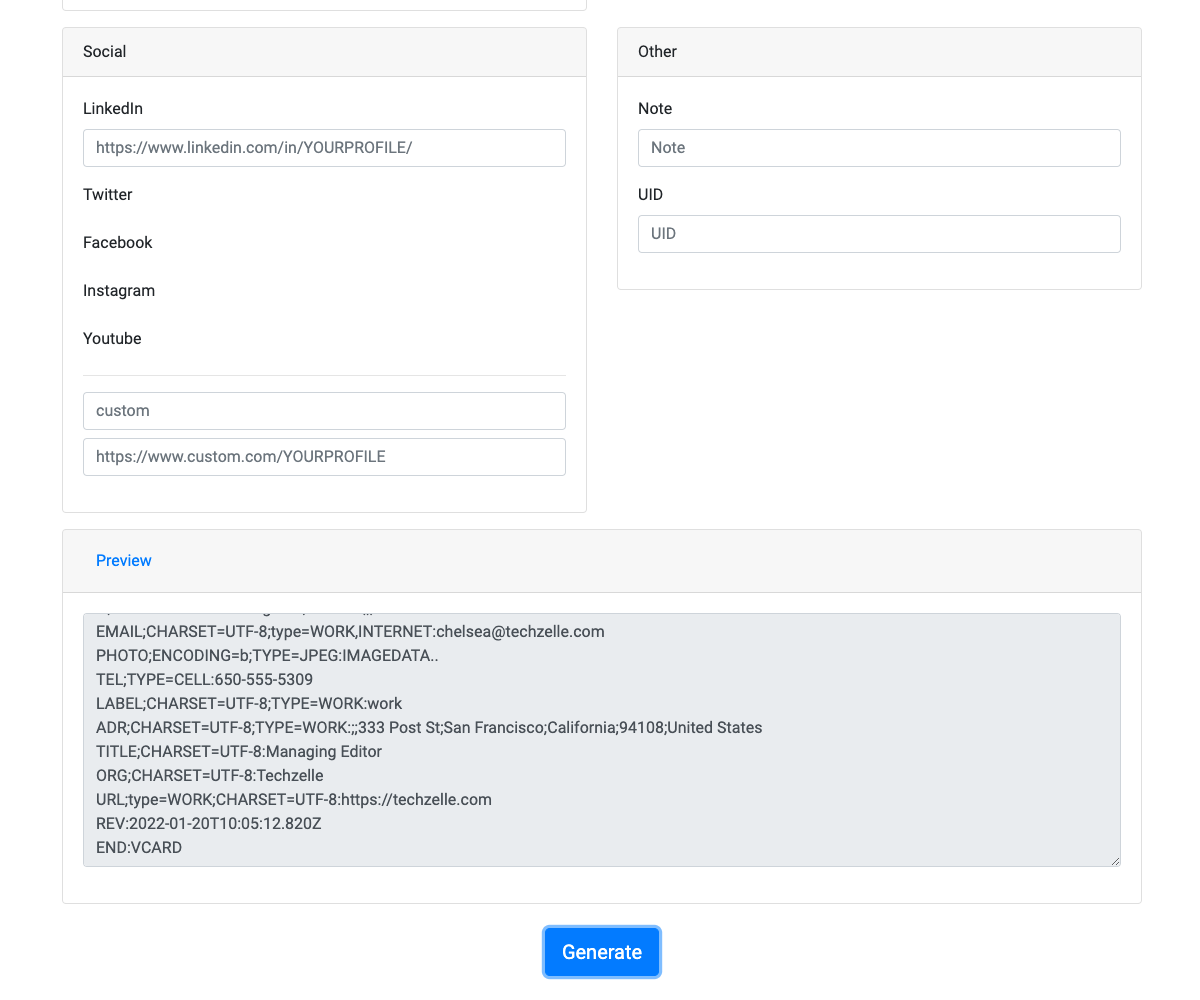
The generate button will download a file called vcard.vcf to your computer. Rename this to something easier to remember, like chelsea-vcard.vcf
Upload The .vcf File To Your WordPress Site
METHOD 1: Using your web hosting control panel (sometimes called cPanel or File Manager) or sFTP file transfer upload this file to your website’s home directory (or another of your choosing). This is necessary so that the “save contact” on your digital business card will function properly.
Anytime you want to update your vCard information, repeat this step and overwrite the existing file with your new .vcf file.
METHOD 2: Alternatively, you can use a WordPress Plugin to enable .vcf file uploads. Go to Plugins > Add New then Search on “vcf upload” and select one that works with your version of WordPress.
NOTE: if you use the plugin method, the file name of the .vcf file can change each time you upload a new revision. Therefore, you may need to update the “save contact” link on your business card page to point to this new filename, accordingly.
Create A Divi WordPress Page For Your Digital Business Card
To speed things up, download this Divi export .json files for you to import at your site:
Tip: Try using a right-click, save link as…
Create a Divi Digital Business Card Page
First we will create a WordPress page for the digital business card using the Import Divi Builder Layout feature.

From WordPress Admin, go to: Pages > Add new
- click Use Divi Builder > Build From Scratch
- click “…” > Portability > Import tab
- click Choose File = card-page.json
- cick Import Divi Builder Layout
- click Save Draft, Exit
After importing, you may notice the default header and footer overlaying your business card. The next subheading resets the header and footer to nothing to preserve the business card formatting.
After fixing the header and footer, return here to edit the business card page to your hearts content.
- replace the demo QR code with the one you created.
- link the Save Contact icon to the .vcf file you created.
Removing the Header And Footer From Your Card
From WordPress Admin, go to: Pages > All Pages
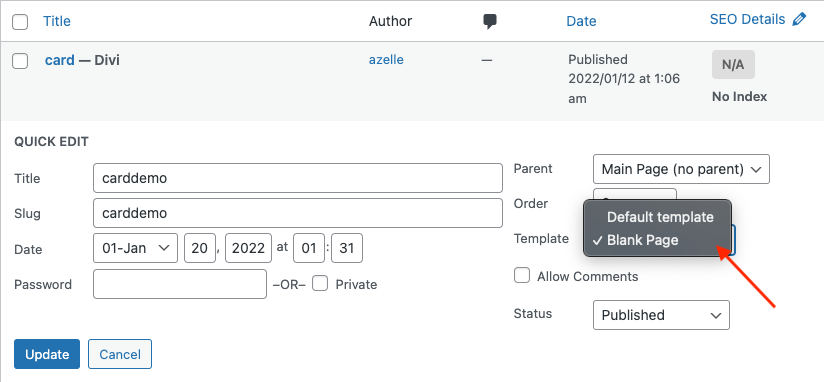
- hover over your Digital Business Card page > Quick Edit
- change Template drop down from default to: Blank Page
- click Update
Divi Design Customizations
Included in the digital business card json template are a couple of notable Design Tab and Advanced Tab customizations. These are already in the json template file so there is nothing for you to do. This is just for your information.
Formatting Card Details Text
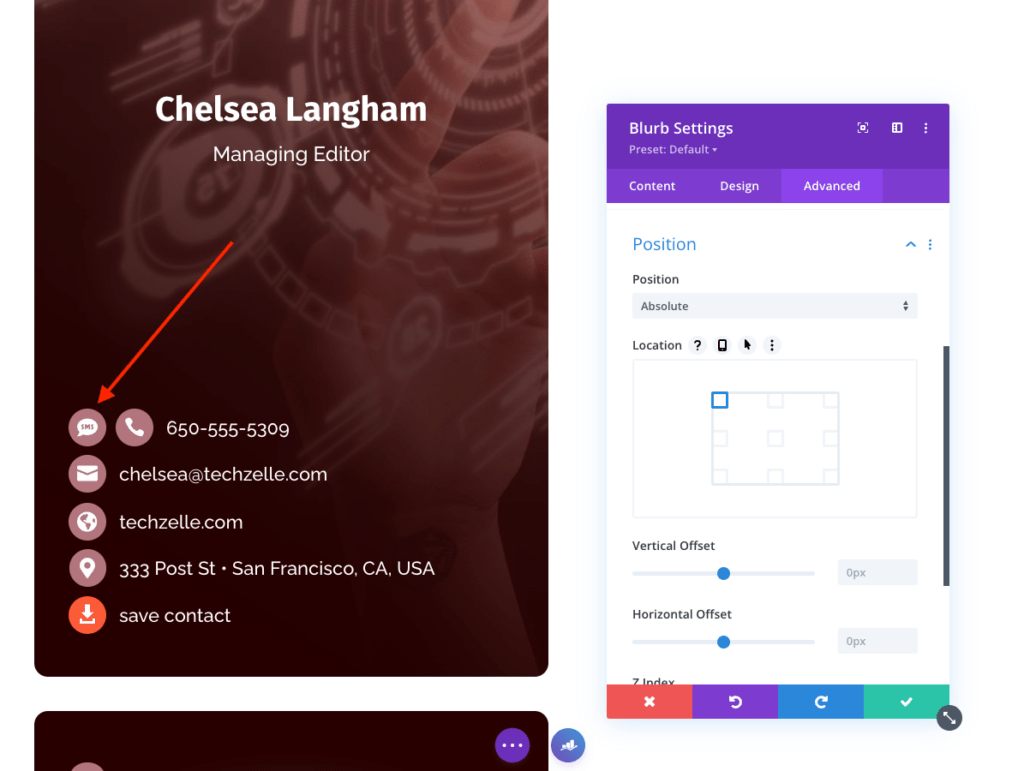
In the business card details, there are blurbs for SMS texting and phone calling. Since these these are two functions on the same telephone number, we’ll put both blurbs on a single line.
For the SMS text blurb, have the icon only and no text. We’ll piggyback onto the phone call blurb text.
Set the Advanced tab > Blurb Position to Absolute. That shifts up the phone call blurb to be on the same line.
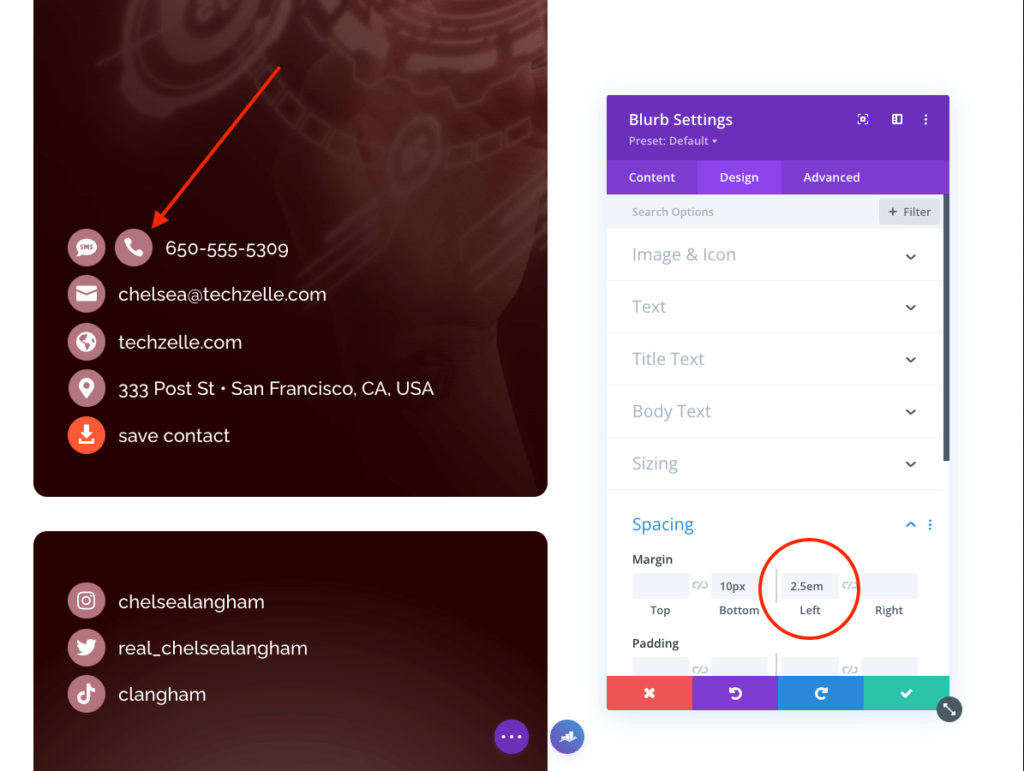
For the phone call blurb: Set the Design > Margin > Left to 2.5em.
That will shift the blurb to the right to reveal the SMS text blurb icon.
Note: We set the units to em as it keeps the spacing proportional to the font size. The mobile view uses a smaller font.
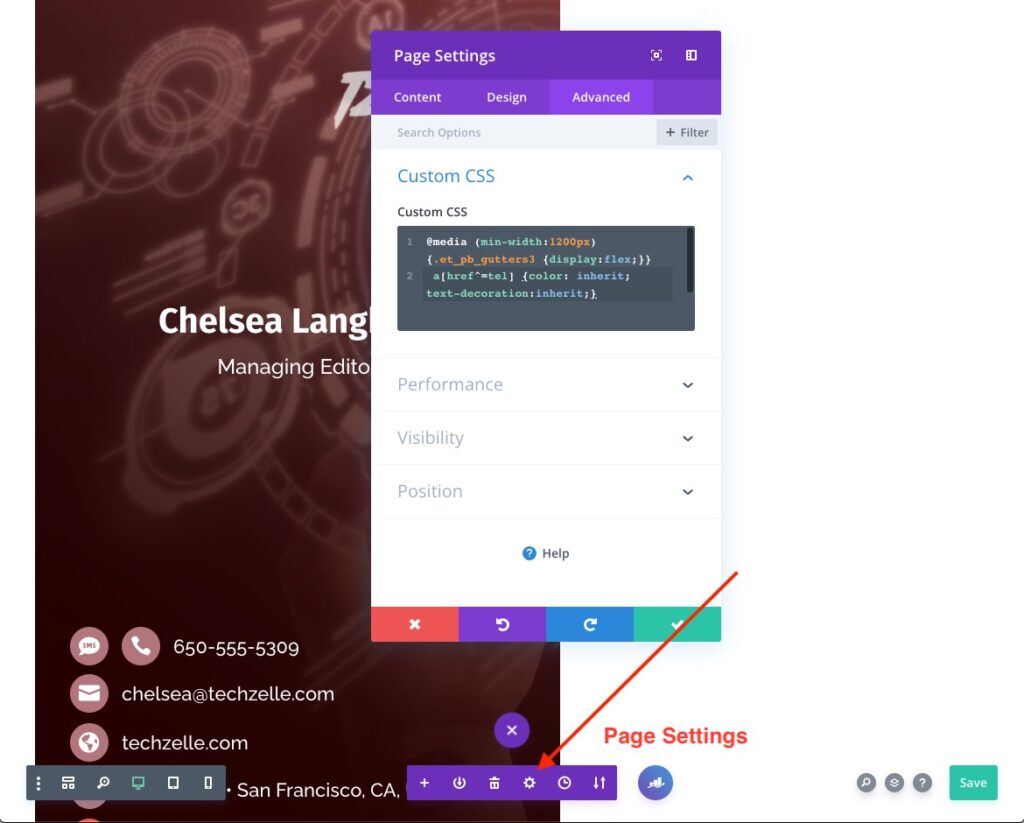
Page Settings CSS
For the Page Settings > Advanced Tab > Custom CSS we have two lines to tweak the formatting of our digital business card.
@media (min-width:1200px) {.et_pb_gutters3 {display:flex;}}
a[href^=tel] {color:inherit; text-decoration:inherit;}
The first (@media) sets the business card to display side by side on the desktop view.
The default is that the card is stacked: front side first, then scroll to the back side.
The second (a[href]) resets the cell phone browser automatic phone number link formatting.
In Apple Safari on the iPhone for example, any text resembling a phone number is automatically converted into a telephone link. A side effect is that it causes the text to have the color and text-decoration of a link. For our purposes, we just want it to show up as regular text.
As a final note, you may want to exclude the page from search engines and your sitemap. That’s easiest to do with an SEO plug-in like RankMath.
Show Off Your Digital Business Card QR Code
Now that you’ve got your digital business card up, it’s time to show it off. Print one out for your office.

Update the Background for your Zoom / Virtual Meetings
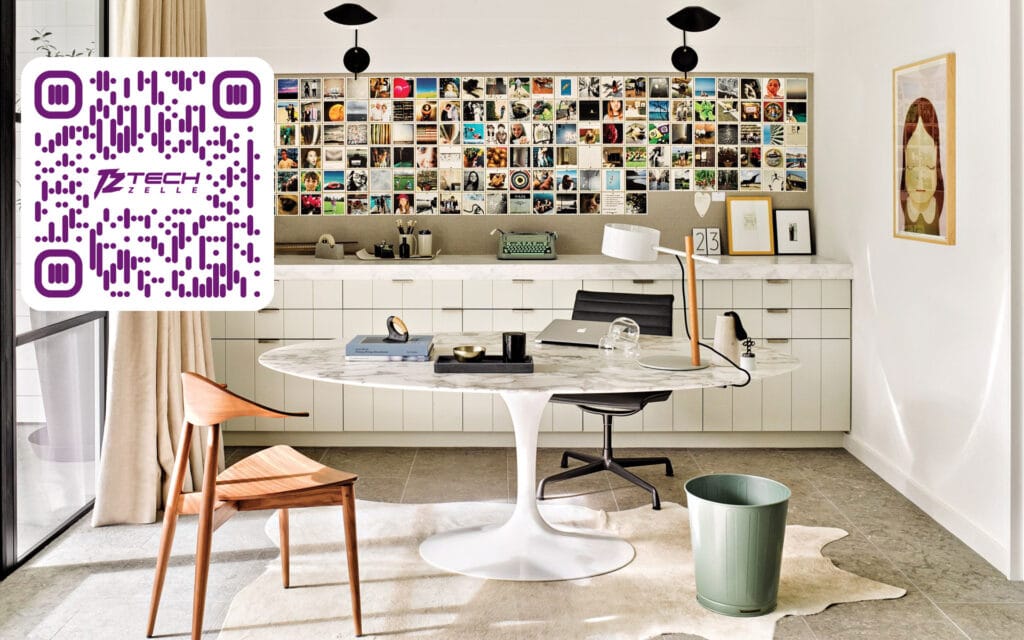
Help others to easily get your contact information by putting your QR code into your video conference background.
Share your Digital Business Card From Your Phone
An easy way to share your Digital Business Card with people you meet in person is to keep the QR code readily available on your phone. Here are a couple options to consider:
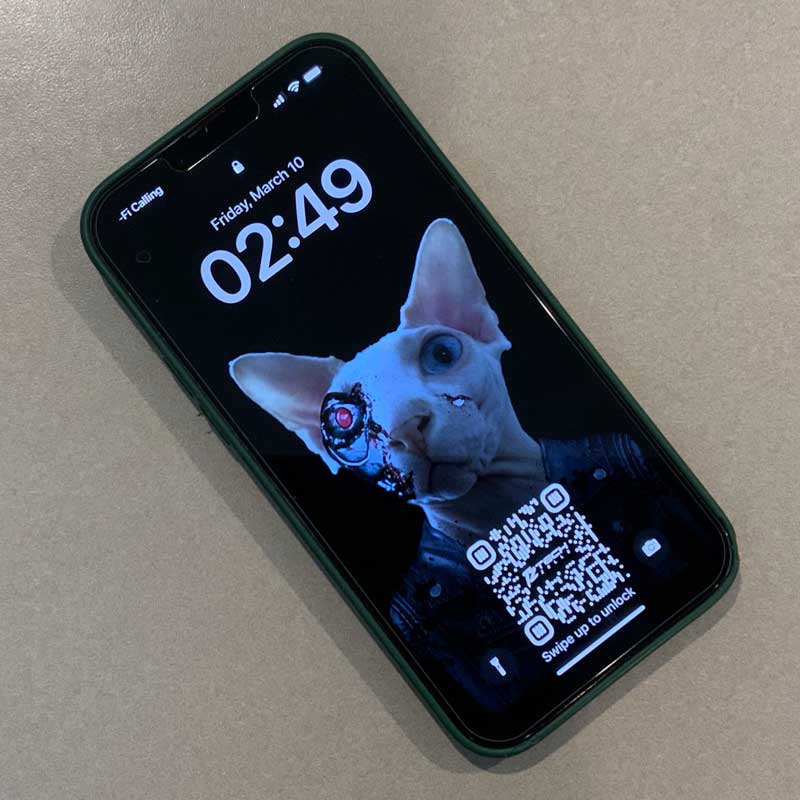
One of the easiest ways to share your digital business card is from a QR code is on your mobile phone lock screen.
As a bonus, if you ever lose your phone, your contact information is right there.
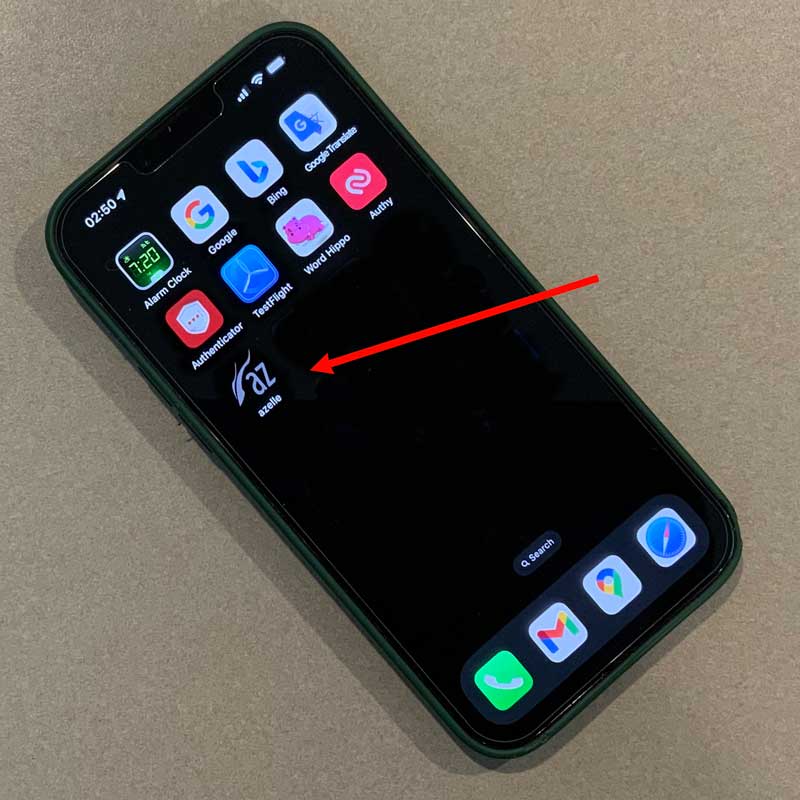
Alternatively, you can navigate to your Digital Business Card (in Safari for iOS, chrome for Android) and use the “Add to Home Screen” function to save it as a shortcut icon.
Now you can bring up your business card with the QR code on the second page with one click.
Divi Digital Business Card Takeaway
Digital Business Cards are the best way to share your contact information with others. They can be updated instantly and best of all, lets you format how your information is stored on their phone – all with one-click of the “save to contacts” button.
If you’ve already got a Divi web site for your business, adding this business card functionality is a snap. Get that going today.
If you’re a one-person business using your personal phone number, it’s time to get a free business phone line.
Hi I have a question on how to link the .vcf file on the save contact. I don’t know how to add the .vcf file if the thing needed is the module link url. Please teach me how. Thank you! f you could provide a demo, that would be a great help.
There are three steps for the .vcf file:
1. create .vcf file on your computer.
2. upload the .vcf file to the web server.
3. link the .vcf file on the web server to the “save contact” blurb on the web page.
For this, edit the “save contact” blurb,
and set the module link url to match the location where you uploaded the .vcf file.
For example, if you upload your danica.vcf file to the root directory (where the wp-config.php resides), then you can use /danica.vcf as the link url.
If you’re going to be having more than a couple of cards, you might want to put them all in a subdirectory (like /cards/danica.vcf ) to keep the root directory cleaner.
Are these directions for WordPress? All of the other information was great. This one i don’t understand.
Yes, this for WordPress.
But, an easier way to manage the vcf files, is to just use a plugin, search for “upload vcf”.
Thank you very much for your tutorial. The only thing I am confused is how to upload the .vcf file because SiteGround didn’t let me do so.
For SiteGround you can use site tools for your website.
Use the Site> File Manager > Explorer > File Upload icon and choose the .vcf file to upload.
Alternatively, you can install an “upload vcf” plugin.
The download is unavailable
What is the error message?
JSON download file:
https://azelle.com/techzelle/card-page.json
hi, great tutorial,thank you. Is there a way to rather have one card instead of 2 pieces of card the one under the other? where can i do adjustments to do so please?
thank you in advance!
What you can do is extend the card front section to make it as long as you want, then delete the card back section.