
How To Get Free Custom Domain Email With Gmail
After you finally found a custom domain name (that wasn’t already taken), registered it, and created a website, it’s time to set up your domain email. For freelancers, families, and small businesses, consider using your existing personal gmail account to send and receive your custom domain email for free.
For existing domains, many people have been using the ‘G Suite Legacy Free Edition‘ for free. But that free google option is no longer available. For some, transitioning to a free custom domain with personal gmail account is a better option than paying monthly fees for Google Workspace.
Update 2022-05: For those on the G Suite Legacy Free Edition, you can keep the free gmail domain email by confirming it is for “personal use”.
What is a Custom Domain Email?
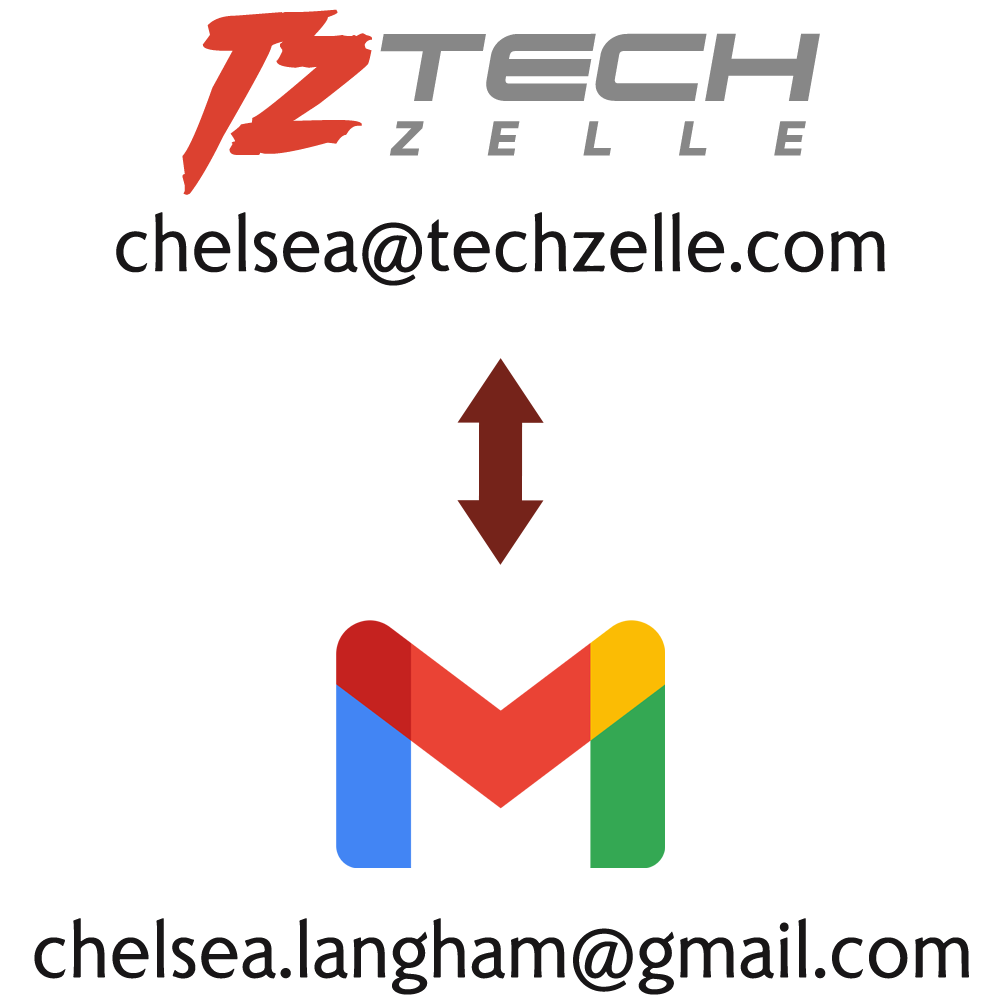
A custom domain email address like: [email protected] is far more credible than [email protected], and let’s be frank, far more impressive. Best of all, is Free!
A custom domain email is one that uses your website’s domain name. It’s a crucial validation point for businesses and organizations, and adds to your professional branding.
Where to Host Custom Domain Email?
Before we get into the gmail account solution, let’s review the most common options for domain email:
- Free at your webhosting provider.
Some webhosting providers include free email service. Avoid this option as bundling email makes it more difficult to switch webhosts in the future. Always keep email separate from webhosting. - Paid provider, Google Workspace, Microsoft 360.
If you are a larger organization with say 10 or more email addresses, you may want to splurge on a paid email service. Or if you have money to burn and want the convenience, this is the way to go. - Free Zoho email service.
Zoho offers a free email option. That issue there, is that you need to use their app / interface. Anything more sophisticated pushes you into the paid options. - personal gmail account.
Gmail is the king for personal email. Most people have it, or should (yes you, yahoo, aol, hotmail users, lol).
Using your personal gmail is a free and convenient way to manage your custom domain email.
Setting Up Custom Domain Gmail
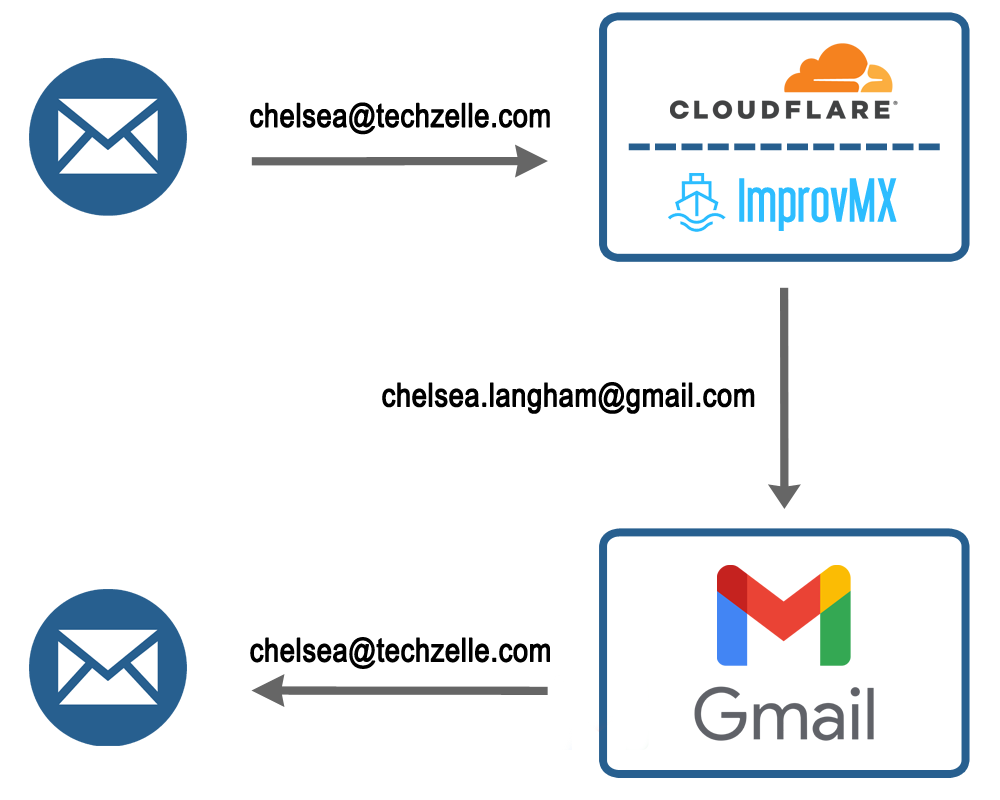
Here is an overview of what are doing:
- Incoming mail is sent to your custom domain email address.
- An email forwarding service (Cloudflare or ImprovMX) forwards that email to your gmail inbox.
- From your personal gmail account, you can reply or send messages as your custom domain email address.
There are two parts for managing your custom domain email with a free gmail account.
- The first, and easier step, is to autoforward emails sent to your custom domain to your free gmail account.
- The second step, is to configure your free gmail account to allow sending, so the “From:” address is from your custom domain.
Receiving Custom Domain Email In Your Gmail Account
Once you set up your custom domain, like: yourcompany.com, you’ll want to forward that domain email to your personal gmail account. That way, you can at least receive mail at your new domain, like [email protected]
Forward Custom Domain Email to Gmail using Cloudflare
Cloudflare provides global network cloud services. I recommend using their free Content Delivery Network (CDN) service and Domain Name Service (DNS) for your WordPress web site. I also use their domain name registration services, but you don’t that to use the email routing service.
TIP: Cloudflare’s domain name registration service is the cheapest around. Consider transferring your domain there before your next renewal, especially if you have been using Godaddy domain registration – which cost more and subjects you to many upsell offers.
The minimum service you need from Cloudflare is the DNS service.
If you don’t have a cloudflare account, register for the FREE option at https://cloudflare.com
Then follow instructions to move your website DNS from your web hosting company to Cloudflare.
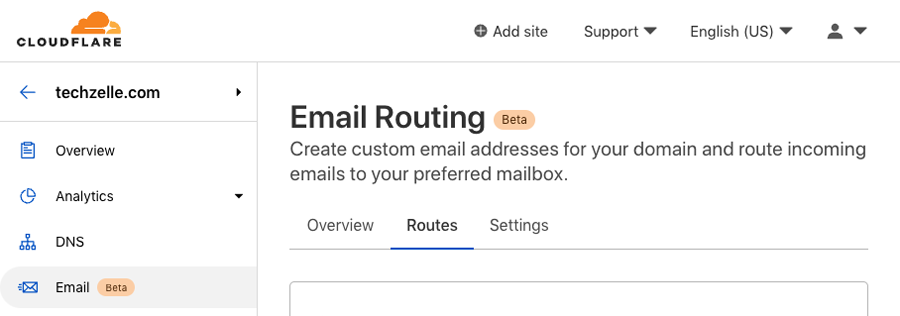
Step 1: Setup Email Routing
Once you have set up your free Cloudflare DNS, you are ready to move on to the email routing / autoforwarding. Click “Email” in the navigation panel.
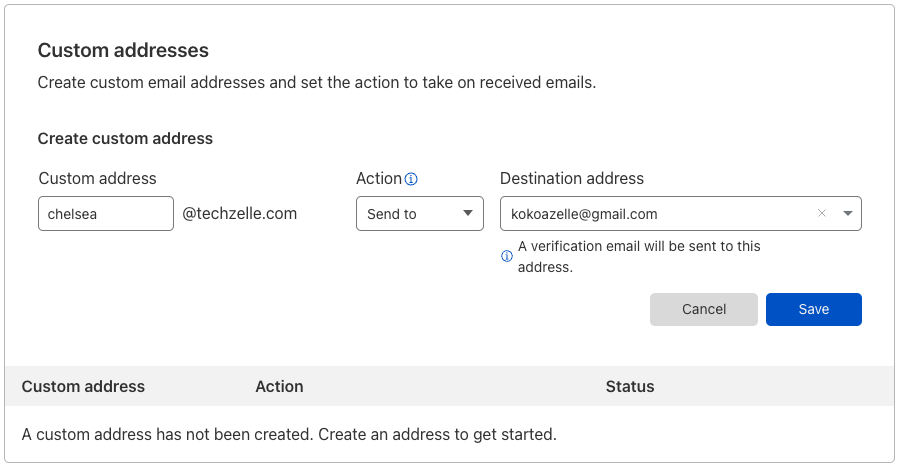
Step 2: Configure the Custom Addresses Section
- Enter the custom address you want to use at your domain.
This will be your main email address at your domain.
This could be something like [email protected], for example: chelseatechzelle.comTIP: Do not use common generic names, like: admin, staff, info, sales, help, support
These common names receive a lot of spam that you don’t need to deal with. If you want to use generic names, change it up to make it unique, like: tzadmin, tzstaff, … - Enter the gmail email address where you want to receive your custom domain emails.
That would be your personal gmail account, for example: kokoazellegmail.com
You’ll need to do their verification process to prove that you own that gmail address.
Step 3: Configure the Catch-All Address Section
This setting controls what should be done with all unspecified email addresses at your domain. You can either drop those emails or send them over to you. I have set it up both ways for different situations.
For a personal domain, or a one-person company where it’s pretty much just going to be you forever getting emails there, then I like to send catch-all emails. This way you can use different branded emails for different purposes.
TIP: When dealing with different companies, I like to give out unique email addresses to each one for tracking and managing spam. I’ll use [email protected] for netflix, [email protected] for amazon, etc. If I ever start getting spam on one of those emails, I know where the leak is. If netflix@ is compromised then I’ll change it to netflix2@ and drop all future emails to netflix@.
For a company domain, I drop the catch-all emails. Only official company email addresses are forwarded, which cuts all the random spam.

TIP: You can still use the unique email address per company technique with the plus sign (+) feature of gmail. For netflix, it would be [email protected], amazon = [email protected], and so forth. All these emails still to to the same gmail account [email protected].
Step 4: Configure the Email DNS Records Section
Finally, configure your custom domain name email DNS records to point to Cloudflare’s email servers. They will take care of the forwarding and dropping emails at your custom domain.
Cloudflare checks your current email DNS records and provides instructions on how to update them as necessary. There is an option to “Add Records Automatically”.
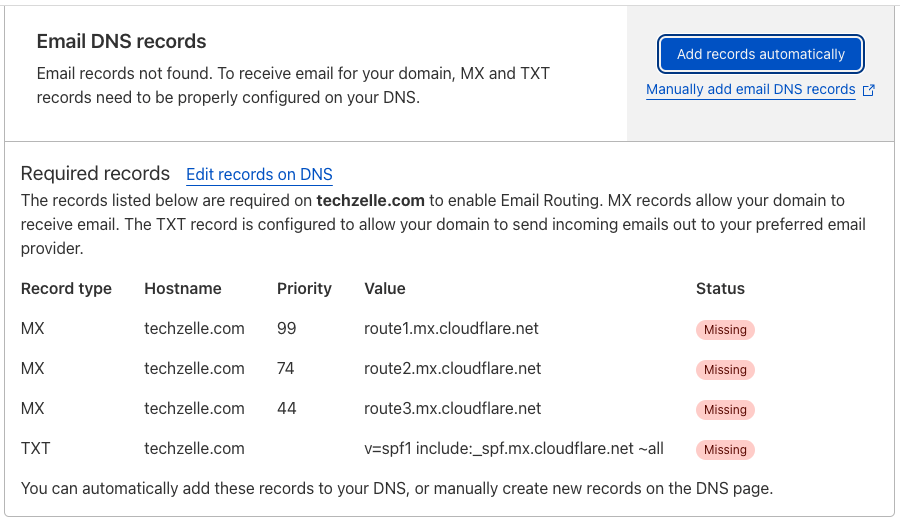
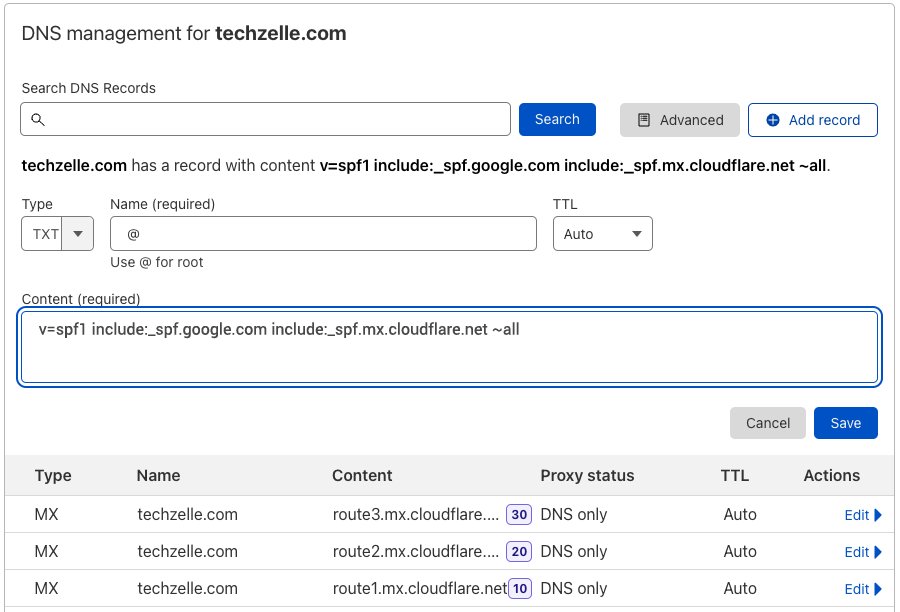
One change, whether you are adding the DNS entries automatically or manually is to correct the suggested TXT record. Here, you want to include the SPF for the gmail servers as we will be sending emails from gmail.
v=spf1 include:_spf.google.com include:_spf.mx.cloudflare.net ~all
Redirect Custom Domain Email to Gmail using ImprovMX
For those of you who do not use Cloudflare for DNS, and do not want to switch, you can keep your existing DNS provider and have ImprovMX handle your domain email forwarding.
As with the Cloudflare setup, you go through the same steps.
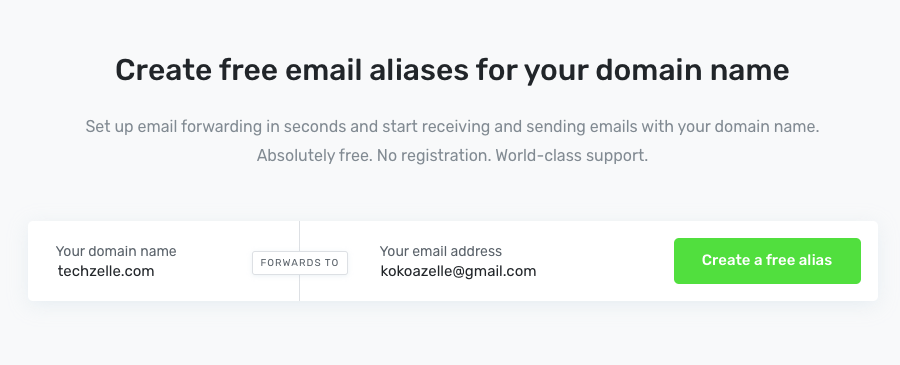
Step 1: Create An ImprovMX Account
Go to: https://improvmx.com
This is as simple as typing in your custom domain name and your personal gmail email address.
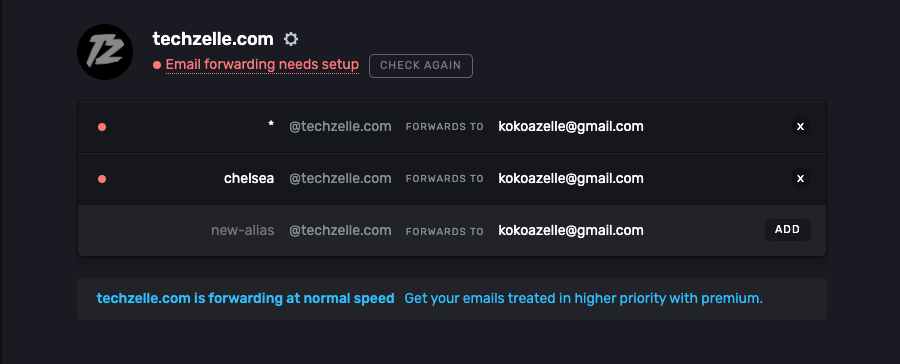
Step 2: Configure the Custom Addresses Section
Type in your custom email address, then click the ADD button.
The Catch-All Email Address is already automatically added. You can delete it if you want to drop them.
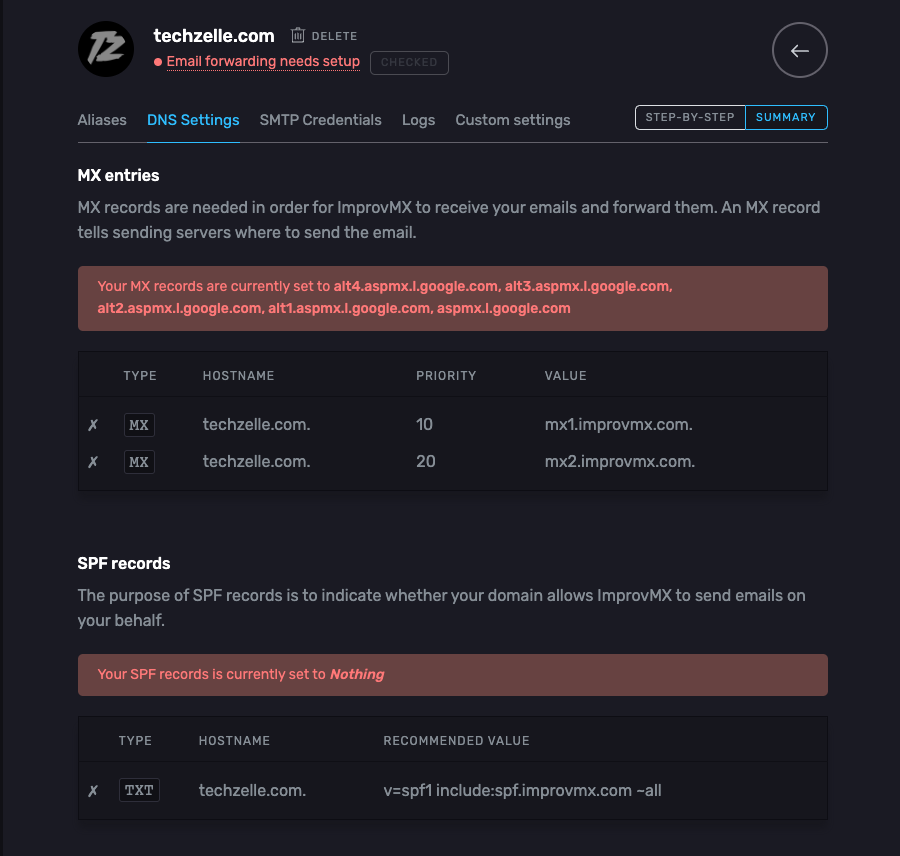
Step 3: Configure the Email DNS Records Section
Just as with the Cloudflare example, update the DNS entries to match the ImprovMX specifications.
The exception is to modify the TXT record to include the gmail email servers:
v=spf1 include:_spf.google.com include:spf.improvmx.com ~all
Sending Custom Domain Email From Your Gmail Account
Now that you are receiving your custom domain email in your gmail account, its time set up the send process.
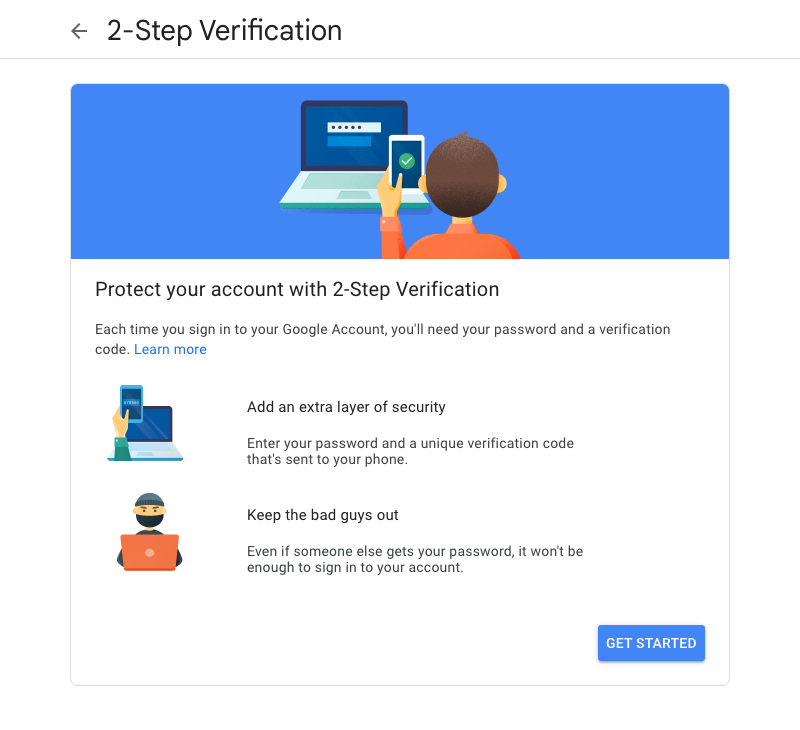
Step 1: Set up 2-Step Verification
If you haven’t already done so, set up 2-step verification on your gmail account. That helps secure your account and is necessary for sending custom domain emails.
NOTE: It used to be possible to use a setting called: Allow Less Secure Apps: instead of 2-Step Verification. This method is no longer supported (May 30, 2022).
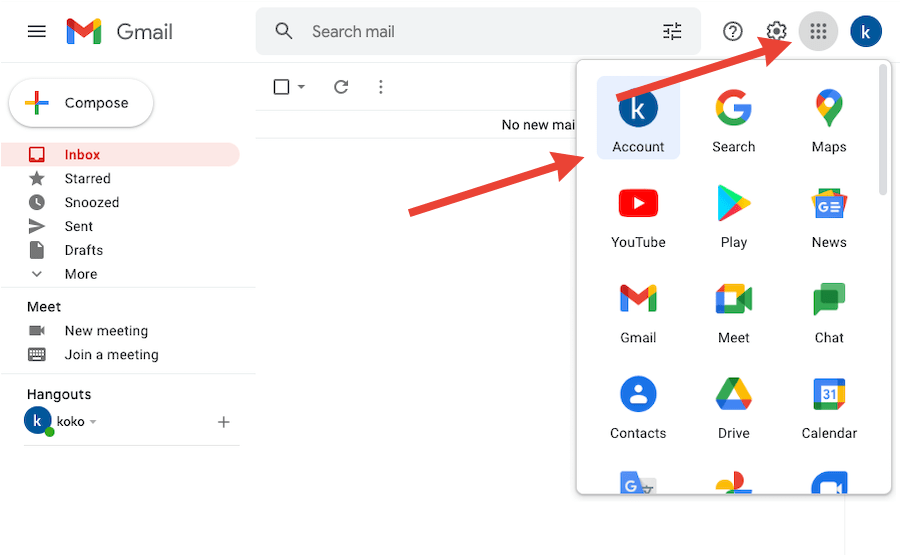
Log into gmail, then click the Google Menu in the top line, then click the “Account” icon.
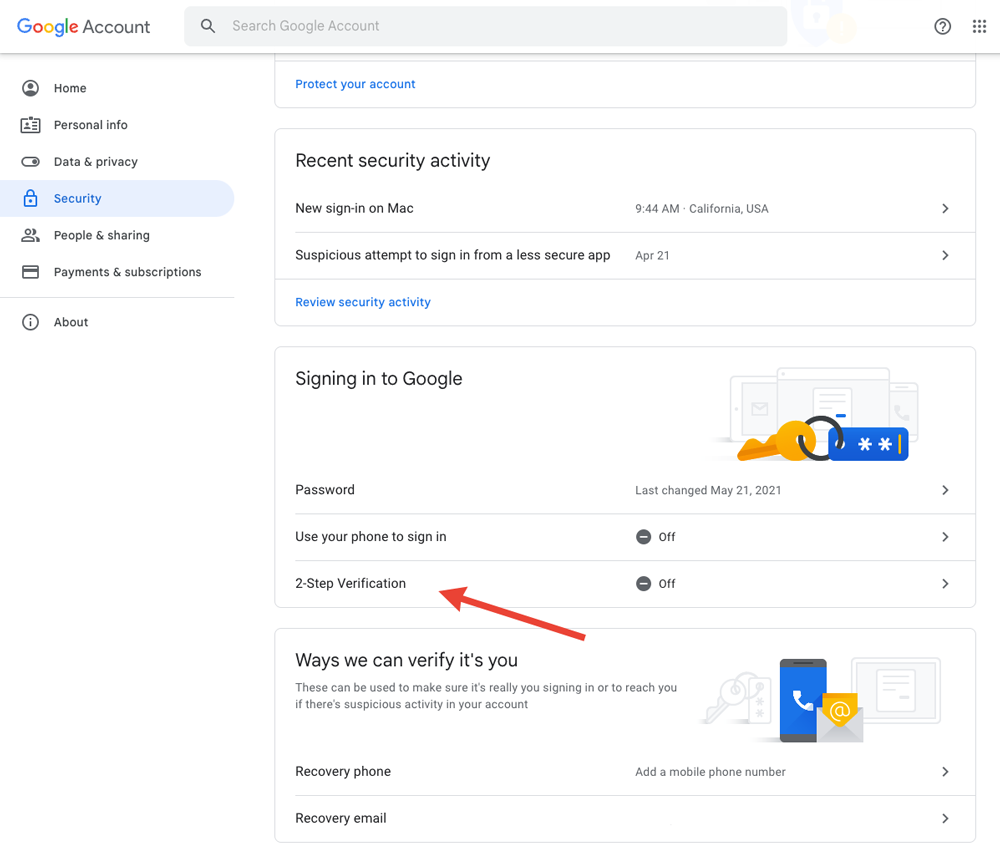
Click the “Security” tab in the Navigation, then the “2-Step Verification” option.
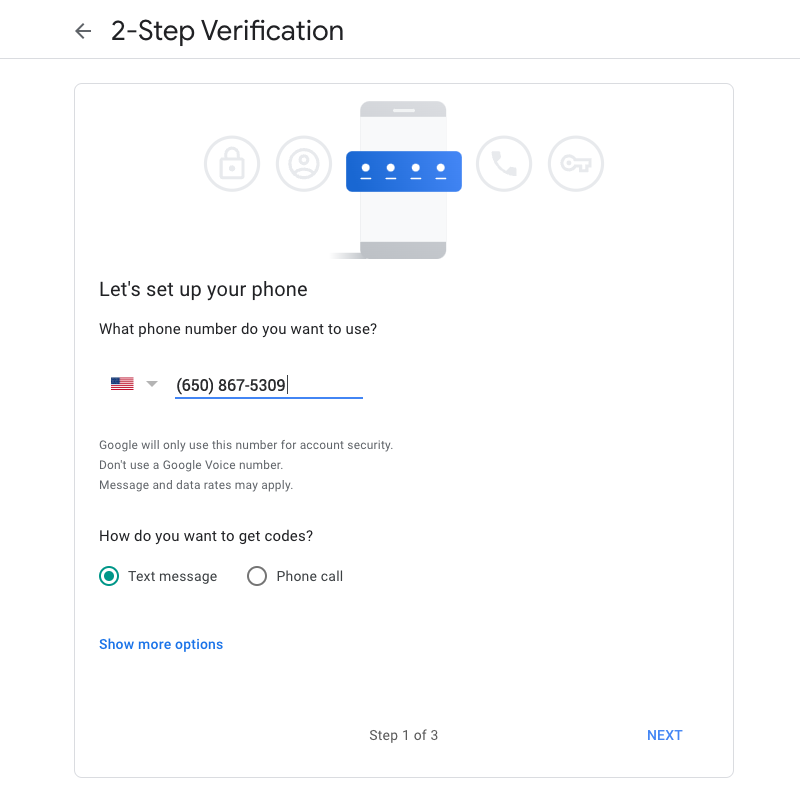
Configure your 2-Step Verification
One common second factor is to use your cell phone number. You can get verification codes through text messages or a phone call.
You’ll also want to configure additional verification methods, just in case you lose your phone or phone number:
- Manual list of Backup Codes – save them somewhere for emergency use
- Authenticator app (authy or google authenticator) – I prefer the better, free Authy app, which I have on my phone, tablet, and macbook. Anywhere you see instructions for “google authenticator” just substitute “authy”.
- Registered computers, to bypass 2-Step verification.
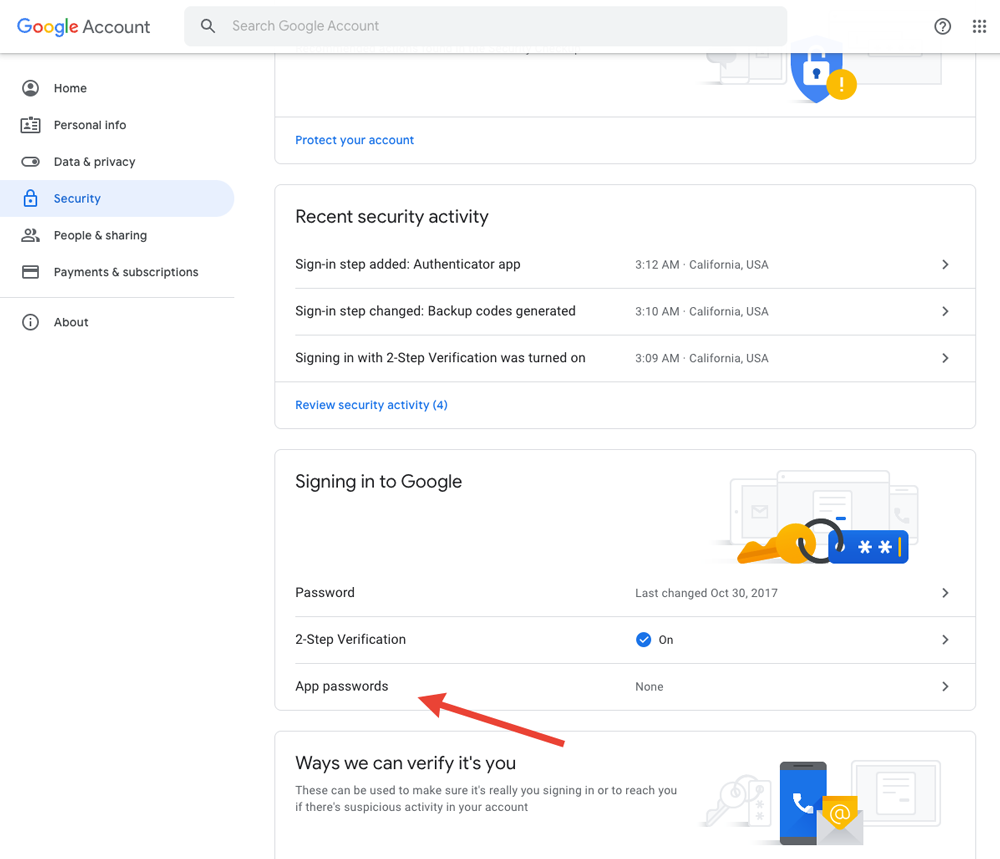
Step 2: Create An App Password
An App Password replaces your actual password and allows applications to securely log into your account.
Click on “App passwords”
For Select app, choose “Mail”
For Select device, choose “Other”
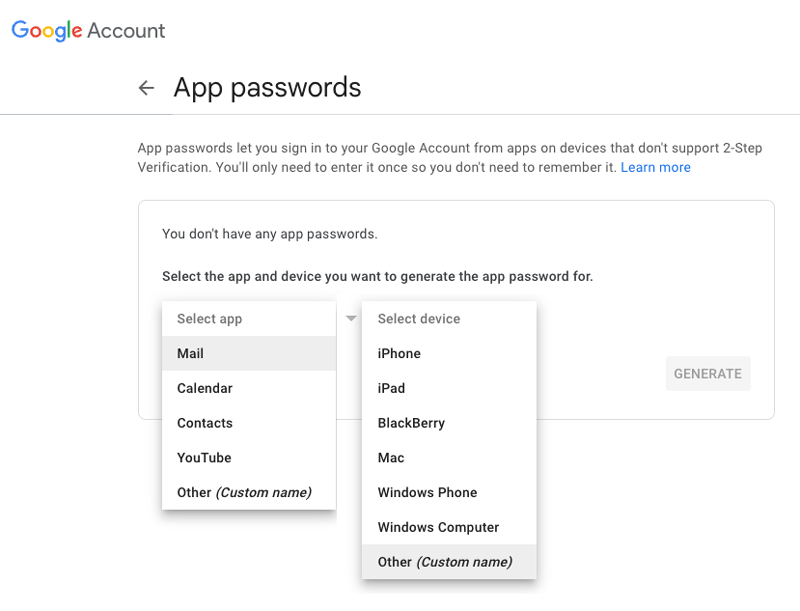
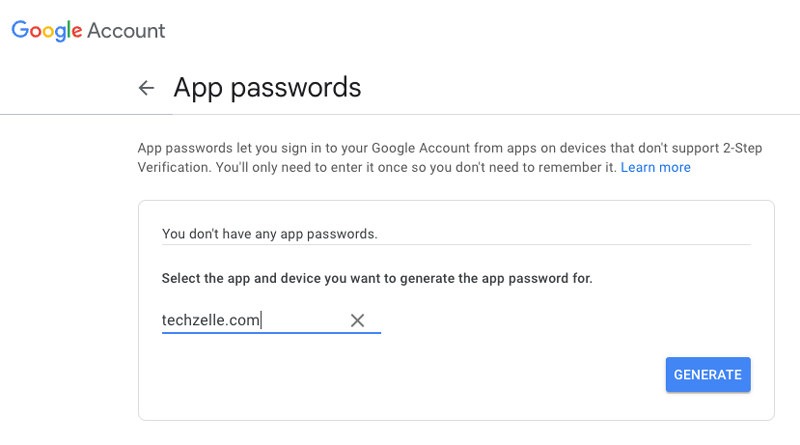
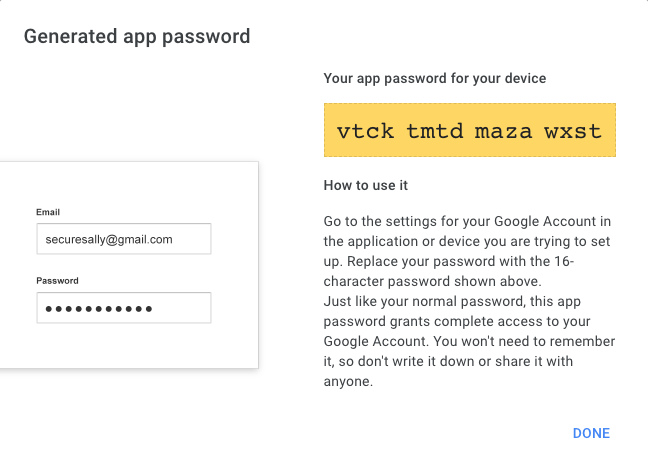
When you choose Select Device = Other, you are prompted for a name.
Enter your custom domain name, and click the Generate button.
Contrary to what it says, you should save this generated app password somewhere, because you’ll never be able to retrieve it again. That said, it’s easy enough to create a new one and delete the old one if necessary.
Step 3: Add Domain Email Account
Now you’re ready to add your custom domain email address.
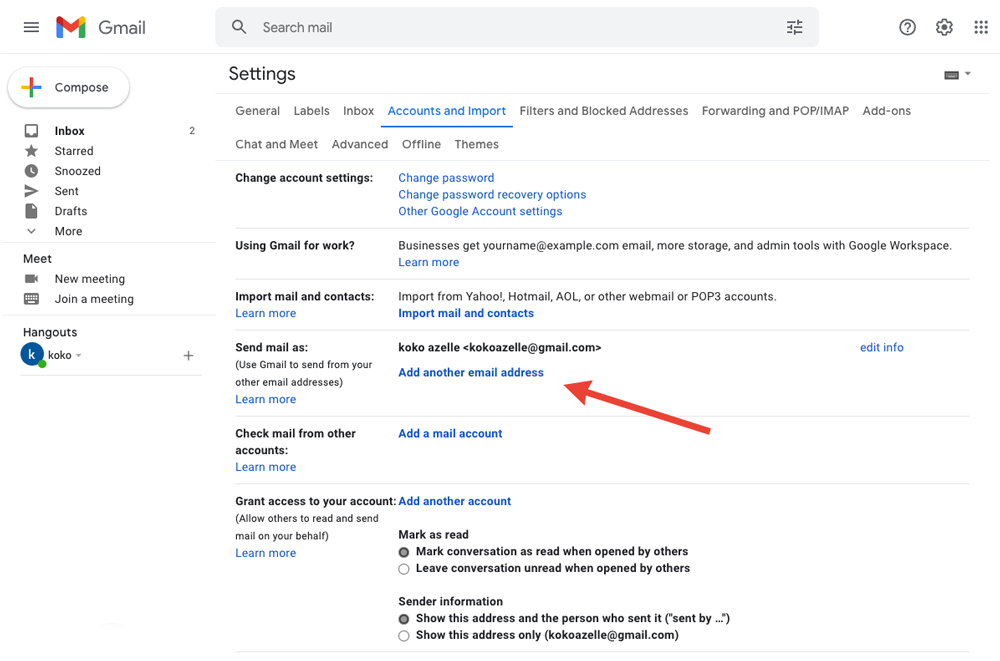
From Gmail, click the Gear icon (Settings) in the top line, then the “Accounts and Import” tab.
Then click “Add another email address”
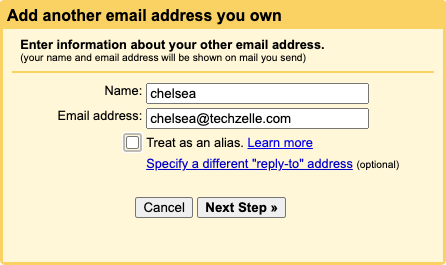
In the pop-up, enter the friendly name and your custom domain email address.
Uncheck the “Treat as alias” (Although it doesn’t matter for our purposes today)
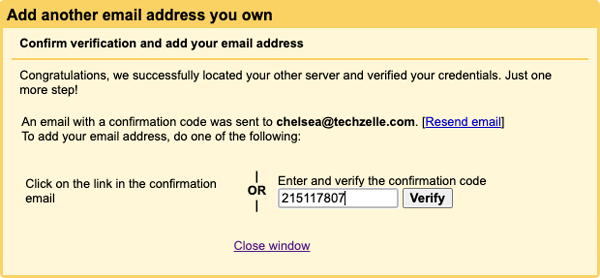
The system, sends a confirmation email to the email address you typed in. This will show up in your gmail inbox, because we have already set up autoforwarding in the first part.
Type that verification code into the verification field and click the Verify button.
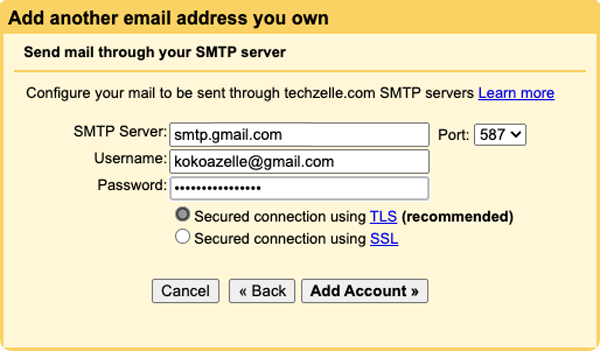
Configure the SMTP server to be: smtp.gmail.com
Username = your full personal gmail account, including the @gmail.com portion
Password = App password from the prior step
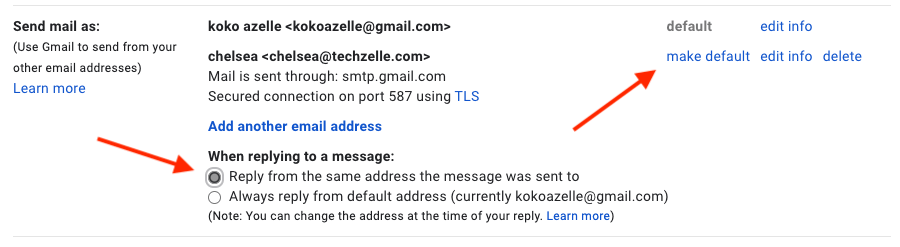
Once you have configured in your new custom email address, it’s time to set up some defaults.
- Choose the default email address you want to use when composing new messages. Most people make the custom email address the default, rather than their gmail address.
- Choose the email address to use when replying to a message. Here you will want to check the “Reply from the same address” option.
Using Free Gmail For Domain Email Summary
Now that you have set up your free gmail account to send and receive emails from your custom domain, try sending test messages to and from your friends or another unrelated email account.
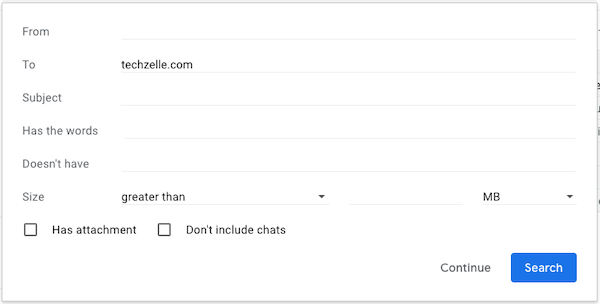
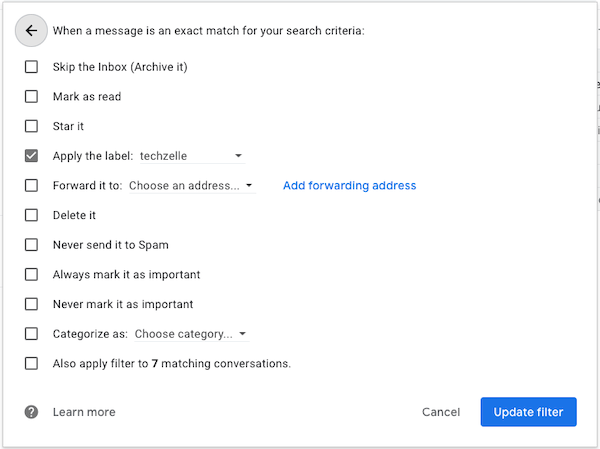
You might also consider using the gmail Settings > Filters and Blocked Addresses: Create a new filter feature to automatically apply a label “work” for all incoming mail that matches, to = “techzelle.com”.
If you have a Divi website, consider adding a free digital business card to your site.
How are you handling your domain email? Are you using paid or free services? Let us know in the Comment section below.